
A home music studio helps you edit and create music at your own home like a pro. Here is how to setup convert your computer into music engine.
You need the following components to get started.
1. A computer with decent configuration.
2. Sound card
3. Speaker
4. MIDI Keyboard
5. Adobe Audition
6. Head Phone
The computer system not only has a good configuration but also has addition features like CD/DVD writer and a 240GB hard disk is recommended. The sound cards and speakers should be of good quality. The quality of these two components are very important because they play an important role in deciding the Input and Output sound quality. A sound card inbuilt in your PC is not suitable for music editing. You can opt for some other sound cards like . Most of them are really cheap and if you the money you can opt for high end sound cards.
Speakers output sound and you need a good speaker to determine the output sound quality. A MIDI keyboard is a must for music creation. Most modern keyboards support MIDI and if your keyboard did not support MIDI then you can get one easily. With a MIDI keyboard you can play keyboard, guitar, drums, flute, and lot of other music devices just using your keyboard.
To record sound you need a good headphone. Try to select the best quality headphones always. They are not just listening devices, but also recording devices. If the headphones are of poor quality hence will the quality of music.
Another very important thing you need is a music recording and editing software. There are lot of software tools available out there. If you are a beginner or professional, I recommend Adobe Audition, which is the best music recording tool I ever know. It is fun and easy to use. No prior training is needed to record and create music with Adobe Audition. If you are a podcaster then this tool will be the most indispensable part of your life.
Finally, you need a clean and lonely room to get started. The room should be without any background noises or disturbing sounds. This is very important if you want to setup a home music studio. If you have all the above components then you can easily start your own home music studio.
Showing posts with label How Tos. Show all posts
Showing posts with label How Tos. Show all posts
Firefox offers us a lot of things to surf online better. It is safe, fast, and perfect. But sometimes you find that it is a bit slow. The reason may be you have installed a lot of add-ons, memory problems, cache size, incorrect configurations you have made etc. So I will tell you how to improve the performance of Firefox.

Add-ons: Firefox is extremely extensible. There are lot of add-ons and themes available in the Firefox website. So you wildly downloaded and installed them. That may be reason Firefox is slowing down. Because having lot of add-ons enabled and using colorful themes means a lot of memory. The best thing you can do is to remove unwanted add-ons. Only try to install add-ons like Adblock which will help you to block pop up ads and something like that which will improve your security and browsing. Do not install add-ons that are unnecessary. Install developer add-ons like Greasemonkey which will help you to customize websites. But use it only when needed. Then try browsing in safe mode than Normal mode. In safe mode you can disable add-ons which will lower the memory usage by Firefox. Using themes add more color to Firefox. You can fashion Firefox using different themes. But many of these themes hog lot of memory. So learn by practice. Use themes that do not require a lot of memory. Avoid themes that slow down Firefox. It is better use the default theme. In this way you can save a lot of memory and improve the performance of Firefox.
Tweaking the configurations: Do you think your Firefox uses a lot of memory and that is affecting your browsing, then you can do this Firefox tweak. It is not recommended anyway. First, type about: config in the address bar and press enter. This will give you access to the configuration settings of Firefox. Now search for "browser.cache.memory.capacity". What this setting is that it determines the amount of RAM that Firefox will use as cache. If you cannot find this setting make sure that "browser.cache.memory.enable” is set to true and create a new preference of the name browser.cache.memory.capacity.
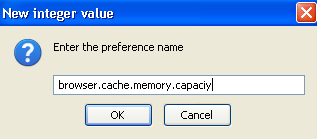
The default setting is -1. This means that Firefox will automatically determine the amount of memory to be used as cache. The setting of 0 means that RAM will not be used as cache. You can enter a value in Kilobytes to manually set this value. For a 256 MB system the setting may be 5000 KB or 5 MB, for a 512 MB system it may be 14000 KB, for 1 GB system it may be 18000 KB etc. This may increase your browsing speed a bit.
Restart Firefox: If you use Firefox for a long period of time then it may become slower and slower. This is because Firefox increases the memory usage from time to time. So if you find that it is lagging a bit then try restarting Firefox.
Update: Another reason Firefox is a bit slow is that you did not properly update it. You may have installed a lot of add-ons or plug-ins. Make sure that you update those plug-ins and add-ons properly.

Increasing browsing speed: Browsing speeds you get is always not constant. Sometimes it is fast, but sometimes it crawls. There are lot of things you can do correct these problems. If you are using Firefox then you can try this tweak to increase your browsing speed. Again type about: config in the address bar and press enter. Now search for "network.http.max-connections". This determines how many simultaneous HTTP connections can be made by Firefox. The larger the value the greater the speed you are going to get. The default setting is 24 or so. You can set this value to something around 35-40 if you are using slower connections. But if you have fast broadband internet connection you can use a setting between 48 and 96. Then you can tweak another setting which is the "network.http.max-connections-per-server" configuration setting. This determines the number of simultaneous connections that can be made to a single server. You can try increasing this value also. The default value is around 8-15. You can try increasing it to somewhat around 25-35. This may also increase browsing speed.
Few other tips: Now I will explain some other things that you commonly do and must do which is very important in keeping Firefox in good condition. First, you must clean your browsing history, including cookies. If you use add-ons like DownThemAll make sure that you also clean its download history. If you have some saved passwords you can chose whether to delete it or not. But making your browser remember your password is dangerous. Instead you can search for "Signons.txt" file in your Firefox directory where all your saved passwords are stored. You can copy it to a notepad file and save it in your hard drive. You can also encrypt it using an encryption tool like NeoCrypt if you have accounts with sites like PayPal, Amazon.com, e-bay etc. Then delete those saved passwords list from Firefox.
I hope you enjoyed this post!
Here is a full fledged online Myspace theme creator. It will help you to easily create themes for your Myspace profile. To get started click here.
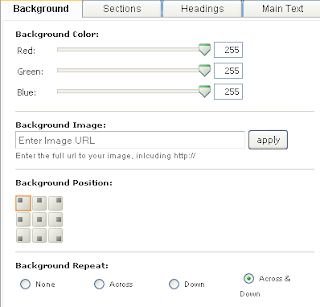

It is a cool Myspace theme creator you will love. What you should have to do is to just click on tabs named Background, Sections, Headings, and each of which relates to different elements of your Myspace profile. For example, the Background section allows you to edit the background components of your profile. In the Background section you can customize the Background color, Background Position, add a background image, align the image etc.
The second is Sections tab which allows you to edit look of each section of your profile. Just play with the sliders until you are satisfied.You are provide with a live preview of what is happening to the look of your profile on the right side. In Sections part you can edit the border size of each page element, Border color, Background color of each section, Border styles, and finally the Opacity.
The next section is Headings where you can edit headings of each section of your profile. The first section here is Name Font section which allows you to edit the way in which your name is displayed in your profile. You can determine the size, font, color etc of your Name. You can also edit Contacting Member Name section properties of your profile here.
The final tab is the Main Text section which allows you to edit the way the details you have in your profile is displayed, its color, font,font size, color of links, and link hover color.
After you have successfully created a cool profile click on the Generate Layout button to apply the changes to your Myspace profile. When you click on this button you will be provide with the instructions to apply theme you have created to your blog. A nice and cool way to create breathtaking themes to your Myspace profile. Also attract more friends and get their appreciations for your artistic themes.
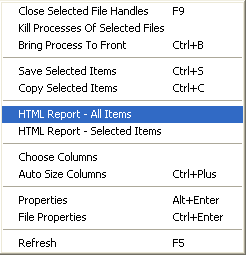
There are times we want to delete some files and we got error messages like "The file is being used by another person or program". This is because the the file in currently in use by an application or process. OpenedFilesView is a tool that allows advanced users to view all opened files in their system along with other details like handle value file position, process, file size, attributes, Full Path etc.

After you have identified the process or application you can use OpenedFilesView to kill the process associated, close the file handles, bring the process to front etc. It can also generate an HTML report of all opened files or a selected file. The HTML file contains the name of the files and their exact path.
You may know that some of the process or files in your system are not genuine or are related to viruses and spywares. Every time you try to delete them you got an access denied message. You can use OpenedFilesView to resolve these " problems. If you are a newbie you find it a bit tough. But it is a very useful tool which helps you identify whether a application running in your system is malicious or not.To download OpenedFilesView click here.

After you have identified the process or application you can use OpenedFilesView to kill the process associated, close the file handles, bring the process to front etc. It can also generate an HTML report of all opened files or a selected file. The HTML file contains the name of the files and their exact path.

You may know that some of the process or files in your system are not genuine or are related to viruses and spywares. Every time you try to delete them you got an access denied message. You can use OpenedFilesView to resolve these " problems. If you are a newbie you find it a bit tough. But it is a very useful tool which helps you identify whether a application running in your system is malicious or not.To download OpenedFilesView click here.
Firefox has a nice bookmarking feature integrated with it. Using this you can easily bookmark your favorite websites. But as the list becomes bigger and bigger you find it very difficult to maintain. So the best thing you can do is to just create a WebPage that links to all your favorite pages you have bookmarked with Firefox. You can automate the task with Firefox. Here is how to create a webpage to access your favorite sites using Firefox.
1. Open Firefox and navigate to Bookmarks menu.
2. Select "Organize Bookmarks" option. This will open up the Bookmarks Library window.
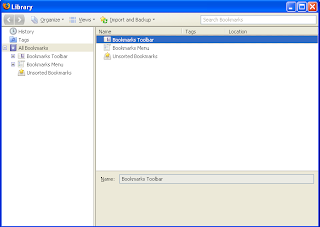
3. Click on "Import and Backup" icon.
4. A pull down menu will appear and from that menu select "Export to HTML" option.
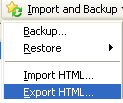
5. Save the HTML file with a name you like.
You have successfully created an HTML version of your Bookmarks. So the next time you want to visit your favorite bookmarks, you can open this webpage and click on the links to access them.The advantage of exporting your favorite bookmarks is that you can make sure that your hard earned bookmarks will not be lost when you reinstall Firefox or due to software crashes. After reinstalling you can import those bookmarks by clicking on "Import and Backup" menu and selecting "Import HTML". Also you can import these bookmarks to Opera or IE.
I hope you enjoyed the post!
Microsoft Word has full-fledged dictionaries in many languages. To select your language you have to go to Review and select Thesaurus.
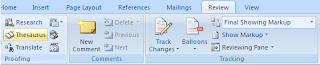
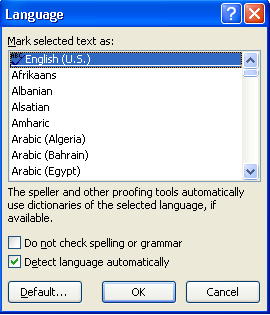
From the window that appears select your language.
If you are using word a lot you know how useful the spell check feature in Word is. After you have just typed the word, Word will highlight it by underlining the word or sentence in red or green. Red means that the spelling of the word is incorrect. Green means that there is a grammar mistake. You can right click on it so that Word will display the possible options. Replace the incorrect word with the correct one in that list or enter the right word yourself.
Word uses the dictionary in it to spell check words. It compares the words you enter with those in the dictionary.
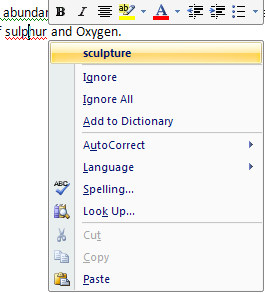
There are some words which are highlighted with a red underline, but when you right click on them you will get no suggestions. If you click on the Autocorrect option also this word will not be replaced with the correct word. Also some correctly entered words are highlighted with a red underline This is because that particular word is not in the dictionary used by MS Word. So you can add that word to the dictionary by right clicking on that word and selecting the "Add to Dictionary" option.
If you are using a lot of medical terms, biological terms, chemical names etc in your documents then you might encounter lot of such red underlines in them. It is better add all the terms you use in a daily basis that are not in the Word dictionary all at once than right clicking on each of them and adding them to the Word dictionary one by one. Here is how to create your own dictionary in Word.
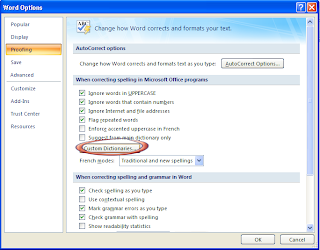
1. Go to Review and select Spelling & Grammar tab.
2. From the Word Options window that appears click on Custom Dictionary button.
3. To add a new word click on Edit Word List..
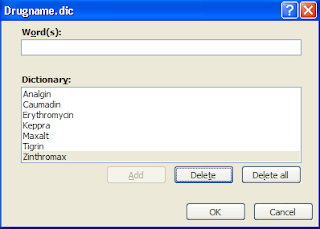
4. To create a new dictionary click on New button. Give a new name to your dictionary and start adding words to it.
But if you add words to your dictionary in this way you can enter only one word at a time.
To add a complete dictionary to word do the following
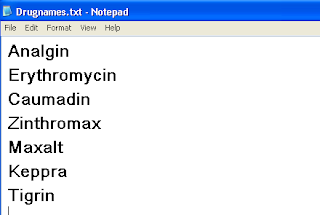
1. Open a new Notepad file.
2. Now type the words, one word per line. There should be no spaces between two lines or words.
3. Save the file and then copy it to C:\Documents and Settings\Username\Application Data\Microsoft\UProof.
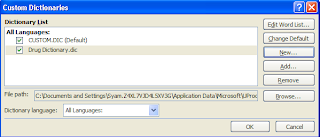
4. Open Word and go to Review>Spelling & Grammar> Proofing>Custom Dictionary
5. The new dictionary will appear in the list.
6. Make sure it is selected by clicking on the check box to the left of your custom dictionary and press OK.
7. Go back to the Word Options Window and Select Proofing.
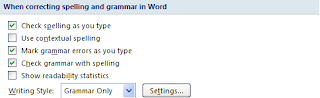
8. Now in the "When correcting spelling and grammar in word" section make sure that all the options as shown in the figure are selected.
9. Click on the Recheck option and press enter to apply your changes.
You have successfully added a custom dictionary to Word!

From the window that appears select your language.

If you are using word a lot you know how useful the spell check feature in Word is. After you have just typed the word, Word will highlight it by underlining the word or sentence in red or green. Red means that the spelling of the word is incorrect. Green means that there is a grammar mistake. You can right click on it so that Word will display the possible options. Replace the incorrect word with the correct one in that list or enter the right word yourself.
Word uses the dictionary in it to spell check words. It compares the words you enter with those in the dictionary.

There are some words which are highlighted with a red underline, but when you right click on them you will get no suggestions. If you click on the Autocorrect option also this word will not be replaced with the correct word. Also some correctly entered words are highlighted with a red underline This is because that particular word is not in the dictionary used by MS Word. So you can add that word to the dictionary by right clicking on that word and selecting the "Add to Dictionary" option.
If you are using a lot of medical terms, biological terms, chemical names etc in your documents then you might encounter lot of such red underlines in them. It is better add all the terms you use in a daily basis that are not in the Word dictionary all at once than right clicking on each of them and adding them to the Word dictionary one by one. Here is how to create your own dictionary in Word.
1. Go to Review and select Spelling & Grammar tab.
2. From the Word Options window that appears click on Custom Dictionary button.

3. To add a new word click on Edit Word List..
4. To create a new dictionary click on New button. Give a new name to your dictionary and start adding words to it.
But if you add words to your dictionary in this way you can enter only one word at a time.
To add a complete dictionary to word do the following
1. Open a new Notepad file.
2. Now type the words, one word per line. There should be no spaces between two lines or words.

3. Save the file and then copy it to C:\Documents and Settings\Username\Application Data\Microsoft\UProof.
4. Open Word and go to Review>Spelling & Grammar> Proofing>Custom Dictionary
5. The new dictionary will appear in the list.
6. Make sure it is selected by clicking on the check box to the left of your custom dictionary and press OK.

7. Go back to the Word Options Window and Select Proofing.
8. Now in the "When correcting spelling and grammar in word" section make sure that all the options as shown in the figure are selected.

9. Click on the Recheck option and press enter to apply your changes.

You have successfully added a custom dictionary to Word!
Everybody loves quizzes especially if they are for fun. Quizzes are an easy way to increase your knowledge and fun. So what about creating your own quizzes and embedding it in your WebPages or sending your friends. Here is how to easily create a quiz online.
MyStudiyo is a website that allows you to create your own quizzes. What you have to do is to register yourself with Mystudiyo. To register click here.

You are just a few clicks away from creating your own quiz. First you have to choose a template for your quiz. There are a large number of templates from which you can choose the apt one. You can also customize these templates by adding splash screens at the beginning and so on. Now it is time to add your questions. The questions should be in text format or you can use your images and videos questions. Then you have to add choices for your question. It is form these choices that a user has to select the right answer. In this way you can add number of questions and their choices. At the end the final score a user got is calculated based on the number of right answers and you can choose up to five custom ways in which the score is to be displayed.
You can also create interactive quizzes in which the user is allowed to submit questions. But he must be a member of MyStudiyo to do so. It is up to you to decide whether to accept the submitted questions or not. You can also include a contact form in your quiz so that users can send you their feedbacks about your quiz.

The quiz you created can be embedded in a webpage. So if you have a blog or is a member of a forum etc you can embed it there. All you have to do is to copy the quiz code provided by MyStudiyo and paste it in your webpage. If you do not have a webpage then you can email the URL of your quiz to your friends so that they can click on that link to participate in your quiz.
A quiz adds variety to your WebPages and allows more interactivity than a poll. So I think it is a nice idea to add a quiz in your webpage which will add more interactivity to your site.
I hope you enjoyed the post!
MyStudiyo is a website that allows you to create your own quizzes. What you have to do is to register yourself with Mystudiyo. To register click here.

You are just a few clicks away from creating your own quiz. First you have to choose a template for your quiz. There are a large number of templates from which you can choose the apt one. You can also customize these templates by adding splash screens at the beginning and so on. Now it is time to add your questions. The questions should be in text format or you can use your images and videos questions. Then you have to add choices for your question. It is form these choices that a user has to select the right answer. In this way you can add number of questions and their choices. At the end the final score a user got is calculated based on the number of right answers and you can choose up to five custom ways in which the score is to be displayed.
You can also create interactive quizzes in which the user is allowed to submit questions. But he must be a member of MyStudiyo to do so. It is up to you to decide whether to accept the submitted questions or not. You can also include a contact form in your quiz so that users can send you their feedbacks about your quiz.

The quiz you created can be embedded in a webpage. So if you have a blog or is a member of a forum etc you can embed it there. All you have to do is to copy the quiz code provided by MyStudiyo and paste it in your webpage. If you do not have a webpage then you can email the URL of your quiz to your friends so that they can click on that link to participate in your quiz.
A quiz adds variety to your WebPages and allows more interactivity than a poll. So I think it is a nice idea to add a quiz in your webpage which will add more interactivity to your site.

I hope you enjoyed the post!
One of the common problems created by Viruses that affect our PCs is that they will disable some important options like registry editor, task manager etc. This virtually disables our administrative privileges on our system.
It is very important to re-enable these options like removing the virus. Sometimes you cannot access your registry, taskmanger etc even when the virus is removed. To solve this problem do the following
RRT(Remove Restriction Tool) is a small software you can download to re-enable the important option disabled by viruses. To download RRT click here.
It is a small download of about 139 Kb. But it is extremely useful. After you have downloaded the zip file unzip it to a location of your choice. Now you have to boot your PC in the safe mode.

Run RRT and check the options you want to enable. Click on the "Remove" button to re-enable the disabled features.
There is a pro version for RRT which helps you to remove malwares that infect through removable storage devices like Pen drives. If you want to use this additional feature you have to purchase RRT.
I hope you enjoyed the post!
IrfanView is a free image editing tool that can be used as an image editor and viewer. Here are some cool things that you can do with IrfanView.
1. Applying filters
IrfanView comes with a bunch of filters that can be used to give a nice look to your photos. To easily apply filters to an image using IrfanView do the following:
Navigate to Image>Effects>Effects Browser or simply press "Ctrl+E".
You will get a list of filters along with the preview of the image before and after applying the filters. Click on these filters to see how your image will look like before it is being applied to it. You can also adjust the filter settings by dragging the sliders associated with each filter.
To apply the selected filter click on the "Apply to original image button".
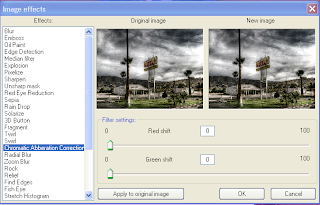
2. Color Correction

Color correction involves making changes to the overall brightness and contrast of a image. It is also used to color balance the image to compensate for any tonal deficiencies and color casts in the original image. Let us see how to do color correction in IrfanView.
To color correct a image in IrfanView chose Image>Enhance colors or press "Shift+G".

You can adjust the Brightness and Contrast of your image to make it look better. You can adjust the RGB values by dragging the Color balance sliders. To darken or lighten the midtones drag the Gamma correction slider to the left or right. You can also enter a Gamma value at the entry box to the right of the Gamma slider. To adjust the saturation of the image drag the Saturation slider.

You can see a live preview of the changes that occur to your image before it is being applied to it. To apply multiple color corrections to your image use the "Apply to image" button. To reset the changes applied to the image you click on "Set default values" button. After you are satisfied with the changes press the "OK" button to apply the changes.

3. To create Grayscale of an image
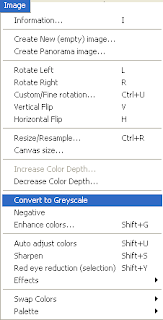
To create Grayscale of an image chose Image>Convert to Grayscale. This will help you to create black and white images from color photos.

4. To pixelize an image
Another useful option in IrfanView is that it helps you to pixelize images. It can be used if you do not want to dispay certain parts of an image.
To pixelize an image first select the region of the image you want to pixelize. Then chose Image>Effects>Pixelize.
5. To crop a image
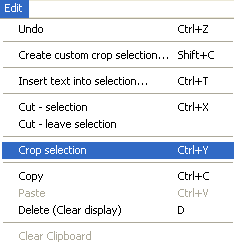
To crop a image, position your cursor on the image, then click and drag to define the crop.
Chose Edit>Crop Selection or press "Ctl+Y" to apply the crop.
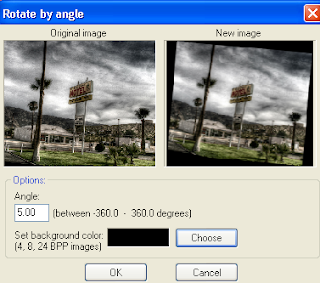
6. To rotate an image
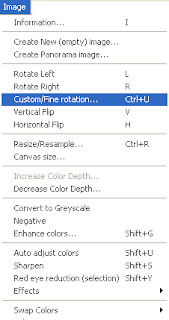
To rotate an image in IrfanView chose Image>Custom/Fine rotation. Enter value of the angle to which the image is to be rotated in the entry box. You can also set the background color of the rotated image here. Click on "Choose" to select a background color. Press "OK" to apply your changes.
7. To create a slide show
You can use IrfanView to create a slideshow and then can save it as an EXE/SCR file. To create a screensaver do the following:
Chose File>Slideshow or press "W". A dialog box will appear which allows you to add images to your slideshow.
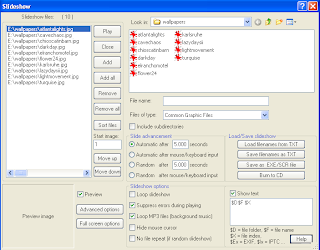
Select a directory to add images to your slideshow. You can add all the images in a directory pressing the "Add all" button. If you want to add only a few images then you can use the "Add" button.
To add an MP3 as background music for your slideshow select an MP3 file and add it to your slideshow. Check the option "Loop MP3 files(background music)" to loop the MP3 song until the end of the slideshow.
Click on "Advanced options" to set whether the slideshow should be displayed in fullscreen, otherwise you can specify a custom size.
Now you are almost done and after specifying the time interval between each slides and a little bit tweaking you can save your slideshow. To save the slideshow click on "Save as EXE/SCR file". If you have Nero Plugin for IrfanView you can burn it to CD or create a VCD by clicking on the "Burn to CD" button.
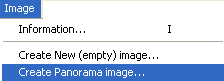
8. Create a Panorama image.
Multiple images can be stiched together to create a large image. Such images are called panorama images. You can create Panorama images using IrfanView. To create a Panorama do the following:
Go to Image>Create panorama image.
A dialog box will appear which prompt you to enter the images to be used to create a panorama.
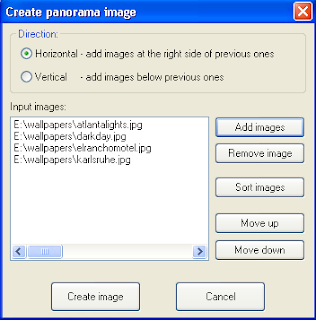
Make sure that you selected the images that closely match each other. Specify a horizondal or vertical alignment. To create a Panorama image press on "Create image" button. You have successfully created a nice looking Panorama image!
Good Luck!
1. Applying filters
IrfanView comes with a bunch of filters that can be used to give a nice look to your photos. To easily apply filters to an image using IrfanView do the following:
Navigate to Image>Effects>Effects Browser or simply press "Ctrl+E".

You will get a list of filters along with the preview of the image before and after applying the filters. Click on these filters to see how your image will look like before it is being applied to it. You can also adjust the filter settings by dragging the sliders associated with each filter.
To apply the selected filter click on the "Apply to original image button".
2. Color Correction

Color correction involves making changes to the overall brightness and contrast of a image. It is also used to color balance the image to compensate for any tonal deficiencies and color casts in the original image. Let us see how to do color correction in IrfanView.
To color correct a image in IrfanView chose Image>Enhance colors or press "Shift+G".

You can adjust the Brightness and Contrast of your image to make it look better. You can adjust the RGB values by dragging the Color balance sliders. To darken or lighten the midtones drag the Gamma correction slider to the left or right. You can also enter a Gamma value at the entry box to the right of the Gamma slider. To adjust the saturation of the image drag the Saturation slider.

You can see a live preview of the changes that occur to your image before it is being applied to it. To apply multiple color corrections to your image use the "Apply to image" button. To reset the changes applied to the image you click on "Set default values" button. After you are satisfied with the changes press the "OK" button to apply the changes.

3. To create Grayscale of an image

To create Grayscale of an image chose Image>Convert to Grayscale. This will help you to create black and white images from color photos.


4. To pixelize an image
Another useful option in IrfanView is that it helps you to pixelize images. It can be used if you do not want to dispay certain parts of an image.
To pixelize an image first select the region of the image you want to pixelize. Then chose Image>Effects>Pixelize.
5. To crop a image

To crop a image, position your cursor on the image, then click and drag to define the crop.
Chose Edit>Crop Selection or press "Ctl+Y" to apply the crop.
6. To rotate an image

To rotate an image in IrfanView chose Image>Custom/Fine rotation. Enter value of the angle to which the image is to be rotated in the entry box. You can also set the background color of the rotated image here. Click on "Choose" to select a background color. Press "OK" to apply your changes.

7. To create a slide show
You can use IrfanView to create a slideshow and then can save it as an EXE/SCR file. To create a screensaver do the following:
Chose File>Slideshow or press "W". A dialog box will appear which allows you to add images to your slideshow.

Select a directory to add images to your slideshow. You can add all the images in a directory pressing the "Add all" button. If you want to add only a few images then you can use the "Add" button.
To add an MP3 as background music for your slideshow select an MP3 file and add it to your slideshow. Check the option "Loop MP3 files(background music)" to loop the MP3 song until the end of the slideshow.
Click on "Advanced options" to set whether the slideshow should be displayed in fullscreen, otherwise you can specify a custom size.
Now you are almost done and after specifying the time interval between each slides and a little bit tweaking you can save your slideshow. To save the slideshow click on "Save as EXE/SCR file". If you have Nero Plugin for IrfanView you can burn it to CD or create a VCD by clicking on the "Burn to CD" button.
8. Create a Panorama image.
Multiple images can be stiched together to create a large image. Such images are called panorama images. You can create Panorama images using IrfanView. To create a Panorama do the following:
Go to Image>Create panorama image.

A dialog box will appear which prompt you to enter the images to be used to create a panorama.

Make sure that you selected the images that closely match each other. Specify a horizondal or vertical alignment. To create a Panorama image press on "Create image" button. You have successfully created a nice looking Panorama image!
Good Luck!
Searching online is not a simple task. To get what you need require lot of skill and understanding about searching online. There are a lot of new technologies and tools that help to make your search efficient, like intelligent keyword prediction that many search engines like Google, Yahoo, Ask etc have. I will tell you a new way to make your search efficient. You can search collaboratively with your friends online and this will definitely make your search efficient and entertaining. SearchTogether is a new search collaboration tool from Microsoft and it helps you to search online with your friends in real-time.
SearchTogether is available as a plugin for IE7. You also have a Live email ID to use this plugin. You can download the SearchTogether plugin for IE7 here. To get a Live email ID click here.
After you have installed the plugin, launch SearchTogether and enter your Live email ID. Now press the connect button. You are ready to start a new search.

To start a new search navigate to Actions> Start a new search. Now you will be provided with your MSN messenger buddies list. Select a person who is online from the list. You can start a search by typing a keyword. The keyword appears below the name or photo of the person who initiated the search. To start searching for a keyword entered by your buddy just double click on it. The number of keywords queried by each participant will appear under his name or photo. So if somebody joins the fun late he will be able to figure out what is going on. You can chat with other members and also comment on websites while searching online.
Another great feature of this tool is that it allows members of a group to monitor each others browsing activity. You can use the Follow option to view or follow the browsing activities of a buddy. You can even watch his or her browser screen in real time using this option. It is a great tool worth a try.
Reference: http://research.microsoft.com/en-us/um/redmond/projects/searchtogether/tutorial.html
Subscribe to:
Posts (Atom)
