WinRAR is a fantastic compression utility. There are a lot of cool features that make WinRAR a great compression tool. I would like to mention some cool features of WinRAR that will help you a lot.
 Create an SFX archive
.
SFX stands for Self Extracting Archives. WinRAR can be used to create SFX files. Sure, WinRAR is great for compressing files. But if you want to send a fie to somebody who did not have WinRAR then it is better to compress the file as an self-extracting archive so that he can open it without the help of an utility like WinRAR.
To create an SFX do the following.
1. First select a RAR archive.
2. Navigate to Tools>Convert archive to SFX.
You will be provided with three modules. Select an SFX module among them. Now click on OK. You have successfully created an SFX archive.
Splitting a file using WinRAR.
Want to split files. You do not need any specialized file splitters to do this task. You can use WinRAR to easily split files. To split files using WinRAR do the following:
1. Select the file or folder you want to split.
2. Now right-click on it and select "Add to archive" option to compress the file.
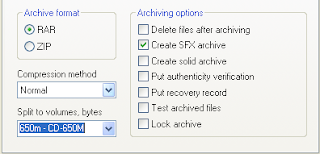
3. From the window that appears click on the "General Tab" and under the section that says "Split to Volumes, bytes" select a size from the drop-down menu and press OK.
 Creating an installer with WinRAR
.
WinRAR can also be used to create installers. It allows an user to install an archive than extracting it. It is also more customizable than an SFX archive. First, right click on the file or folder which you want to compress and select the option that says "Add to archive". From the window that appears check the option that says "Create SFX archive".
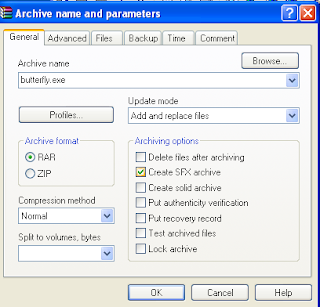
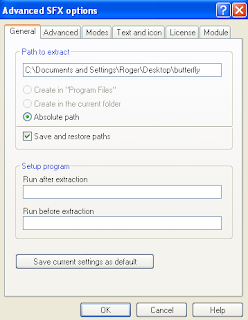
2. Now click on "Advanced" tab and then on the "SFX Options" button.
3. Here you can enter a path to which the file is to be extracted, enter the name of a program to be executed before or after the installation, add an icon to your archive, display a license text after the installation etc.
 Protecting an archive with Passwords
.
You can also protect your archives created with WinRAR using passwords. To do this just right click on a file or folder and select the option that says "Add to archive". From the window that appears click on "Advanced" and then on "Set Password.." to set a password to your archive. Only when the password is entered correctly that a person can open the archive.
Estimate the time taken to compress a file.
You have a large file and you want to know how much time it will take to compress the file. Then do the following:
1. Navigate to Start>Programs>WinRAR.
2. Browse for a file or folder you want to compress.
3. Select the file or folder and click on the "Info" icon.
4. Click on "Estimate" button.
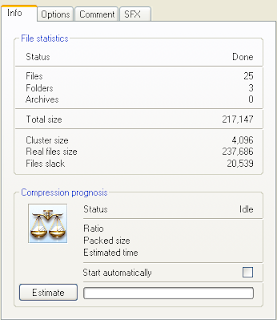
You can also use this option to know the information about an archive in your computer.
Repair an archive.
To repair an archive select the archive and click on "Repair" icon. Before repairing an archive select a location to which the repaired file is to be stored, and archive type. Now press OK to continue. You can repair both zip and rar archives using WinRAR.
Hope you enjoyed the post!
Want to make your blog more attractive and interactive. The best thing you can do is to embed some games to it. That will definitely make people stay in your site for some long time.
Heyzap is a flash game publishing site that allows game developers to create, and share games through a blog or a website. What you have to do is to upload your flash game by creating a widget and then specify its height, width etc. Then the game will be evaluated by Heyzap and if it is approved you get the URL and the code to embed the game in your website or blog.
The games are well categorized. Publishers of games will find it so easy to submit their games here. They can also generate extra cash because Heyzap offers revenue sharing for the pre-roll video ads. It also offers a nice dashboard through which developers can track the game usage and its popularity.
For bloggers they can be able to attract and hook more readers to their sites by posting game links from Heyzap.
heyzap.com - embed games
Firefox offers us a lot of things to surf online better. It is safe, fast, and perfect. But sometimes you find that it is a bit slow. The reason may be you have installed a lot of add-ons, memory problems, cache size, incorrect configurations you have made etc. So I will tell you how to improve the performance of Firefox.
 Add-ons
: Firefox is extremely extensible. There are lot of add-ons and themes available in the Firefox website. So you wildly downloaded and installed them. That may be reason Firefox is slowing down. Because having lot of add-ons enabled and using colorful themes means a lot of memory. The best thing you can do is to remove unwanted add-ons. Only try to install add-ons like
Adblock which will help you to block pop up ads and something like that which will improve your security and browsing. Do not install add-ons that are unnecessary. Install developer add-ons like
Greasemonkey which will help you to customize websites. But use it only when needed. Then try browsing in safe mode than Normal mode. In safe mode you can disable add-ons which will lower the memory usage by Firefox. Using themes add more color to Firefox. You can fashion Firefox using different themes. But many of these themes hog lot of memory. So learn by practice. Use themes that do not require a lot of memory. Avoid themes that slow down Firefox. It is better use the default theme. In this way you can save a lot of memory and improve the performance of Firefox.
Tweaking the configurations: Do you think your Firefox uses a lot of memory and that is affecting your browsing, then you can do this Firefox tweak. It is not recommended anyway. First, type
about: config in the address bar and press enter. This will give you access to the configuration settings of Firefox. Now search for "browser.cache.memory.capacity". What this setting is that it determines the amount of RAM that Firefox will use as cache. If you cannot find this setting make sure that "
browser.cache.memory.enable” is set to true and create a new preference of the name browser.cache.memory.capacity.
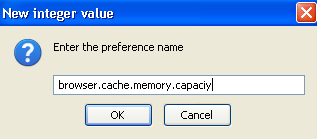
The default setting is -1. This means that Firefox will automatically determine the amount of memory to be used as cache. The setting of 0 means that RAM will not be used as cache. You can enter a value in Kilobytes to manually set this value. For a 256 MB system the setting may be 5000 KB or 5 MB, for a 512 MB system it may be 14000 KB, for 1 GB system it may be 18000 KB etc. This may increase your browsing speed a bit.
Restart Firefox: If you use Firefox for a long period of time then it may become slower and slower. This is because Firefox increases the memory usage from time to time. So if you find that it is lagging a bit then try restarting Firefox.
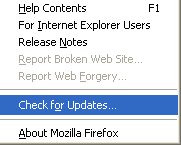
Update: Another reason Firefox is a bit slow is that you did not properly update it. You may have installed a lot of add-ons or plug-ins. Make sure that you update those plug-ins and add-ons properly.
 Increasing browsing speed
: Browsing speeds you get is always not constant. Sometimes it is fast, but sometimes it crawls. There are lot of things you can do correct these problems. If you are using Firefox then you can try this tweak to increase your browsing speed. Again type about: config in the address bar and press enter. Now search for "network.http.max-connections". This determines how many simultaneous HTTP connections can be made by Firefox. The larger the value the greater the speed you are going to get. The default setting is 24 or so. You can set this value to something around 35-40 if you are using slower connections. But if you have fast broadband internet connection you can use a setting between 48 and 96. Then you can tweak another setting which is the "network.http.max-connections-per-server" configuration setting. This determines the number of simultaneous connections that can be made to a single server. You can try increasing this value also. The default value is around 8-15. You can try increasing it to somewhat around 25-35. This may also increase browsing speed.
Few other tips: Now I will explain some other things that you commonly do and must do which is very important in keeping Firefox in good condition. First, you must clean your browsing history, including cookies. If you use add-ons like
DownThemAll make sure that you also clean its download history. If you have some saved passwords you can chose whether to delete it or not. But making your browser remember your password is dangerous. Instead you can search for "Signons.txt" file in your Firefox directory where all your saved passwords are stored. You can copy it to a notepad file and save it in your hard drive. You can also encrypt it using an encryption tool like
NeoCrypt if you have accounts with sites like PayPal, Amazon.com, e-bay etc. Then delete those saved passwords list from Firefox.
I hope you enjoyed this post!
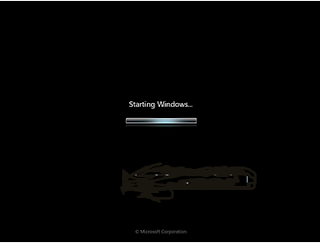
The new Windows 7 Beta is out there. It is available as a free download now. The version is just for testing purposes and will expire in August.
The new Windows 7 Beta 1 promises a lot of amazing features. First, it installs faster than Vista and even XP. Vista is a fantastic OS. But it is definitely a resource hogging OS. Windows 7 is noticeably fast and sleek without the frills in XP and Vista and still offers a bunch of features.
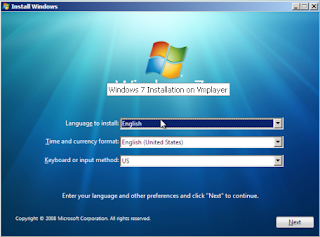
Installing Windows 7 is a breeze. First download it
here. It is a beta, so make sure you have backed up all your useful data before installing Windows 7. It is better run it in a virtual machine. So read this article
how to run Windows 7 on XP and Vista using Vmware. You can directly download the iso image from
here. You can also download the torrent of the ISO image
here. After you have downloaded the beta image burn it to a DVD and then boot from it. Then you need activation key to continue your installation process. You can read an article about activating Windows 7
here.
Windows 7 comes with a bunch of features. One of the greatest hyped feature in Windows 7 is the Superbar. It is being unlocked in Windows 7 Beta release. It will show you thumbnail views of applications that is being opened. You can hover your mouse over these thumbnails to expand them into view. The 3D style pop up windows is amazing.
The OS just looks like Vista. At first sight you cannot discriminate it from Vista. But there are lot of changes within. That is evident in the way it handles processes, runs applications, manage memory, processor support etc.
One great feature that I noticed is not quite useful you may say. But is a great improvement. We can install patches without rebooting the system.
Lot of changes are made to the Aero interface. To run Aero in Windows 7 you did not need a powerful processor or a lot of memory. The Aero runs faster and transition effects works much better than in Vista. The windows can be snapped to sides and the icons looks almost life like. The button bar is translucent which can be easily arranged by just clicking and dragging on it.
Windows 7 has a new feature called Action Center, which will co-ordinate all the security issues, updates, and alerts. Windows 7 also has Windows Defender by default. Another feature added to Windows 7 is the ability to burn ISO images.
Some of the features are locked in the Beta because they are incomplete. If you want to know how to unlock these features read it
here. Overall it is a nice OS. The happy news for customers is that Microsoft is offering Windows 7 as free upgrade for customers who purchased Vista after July 1. I do not know it is a limited time offer. So it means XP is already nearing its end and the new Vista honeymoon will also end somewhere in the near future. But we have to wait because Windows 7 is going to release as a full OS only in 2010 or so. Again it is just a rumor. But one thing is certain Windows 7 is one of the perfect Beta release of an OS ever. It is a bit buggy at times. But almost perfect at every aspect.
Labels:
best blogging clients,
Blogdesk,
Blogging,
blogging clients,
blogjet,
ecto,
Flock,
Live Writer,
Qumana,
Scribfire,
Social browser,
Zoundry
Blogging is very popular now a days. Blogs are the free and best platform to share your ideas with the world. So it is time to think seriously about some offline blog editors that will help you to write blogs, edit, and post them. Here is a list of the best blog editing tools that can make your blogging more fun and easy.
1.
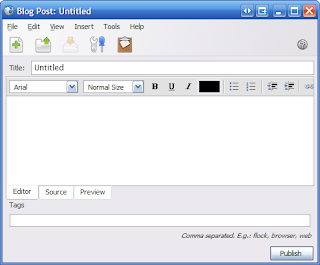
Flock: Flock is the best offline editor available now. It can be used as a browser/blog editor. It can be considered as a social browser that is designed to fulfill your social networking, blogging, and browsing needs. You can use Flock as your Blog client. It is an excellent offline blogging client that works with all major blogs sites like LiveJournal, Blogger, Wordpress, and a wide range of other platforms including Metaweblogs. Due to this universality it can be considered as the best offline blogging client. Creating and posting blogs with Flock is so easy. Install Flock, and when you run it for the first time, you will be prompted to enter the URL of your blog, User name, and password to log in to your blog. Enter those details correctly and you are all set to go.
A cool feature of Flock is the "Blog This" feature. If you see some interesting content or a photo, or anything else so interesting just right click on it and Select "Blog This" to instantly post it to your blog. There are a lot of cool features that Flock has and you can explore it to learn more about Flock.
 BlogDesk
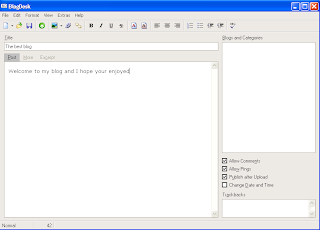
: Another great offline blogging tool you can use and it is free. You can use this to easily post your blogs. But I think it is not as flexible as Flock. The striking features of this tool is that it has a good tag editor. You can add your tags to a list and whenever you want to add a tag to your posts, you can add it from the list. It has a spell checker! The spell checking is a useful feature. I think configuring it is a bit tough. To configure BlogDesk you have to select File> Manage Blog. There are two ways to upload images via BlogDesk. First you can directly upload images which is the easiest way and the second method is to use FTP protocol. You can edit your images within BlogDesk because it offers basic image editing features like cropping, rotating, and changing file formats etc. Some other features of note are that BlogDesk allows you to edit already posted blogs. Then it has a auto save feature which will automatically save your post in a folder locally so that you did not have to take a backup of your blogs.The only down side is that it did not support a lot of blog platforms. Actually I cannot find the name of Blogger in the supported blog list. But it definitely worth a try.
 Live Writer
: Live Writer is a cool blogging client from Microsoft. But installing it is a bit tricky for me. When I clicked on the install button I see a message that I have to upgrade my installer. So make sure you have updated your system with the latest Windows installer. A nice article to solve installation problems for Live Writer is available
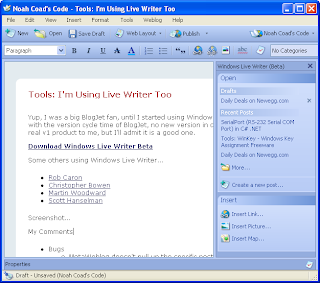
here. Liver Writer is free to use and offers a bunch of features to make your blogging more efficient. It is so easy to use Live Writer because it has a lot of nice features that makes your blogging easy. You can create posts exactly the way it looks in a web browser. This is because Live Writer will download a copy of the CSS style you are using in your blog and keep a local copy of it. The next feature that I noted is that it allows you to add maps to your post via Windows Live Local. Live Writer has an auto correct option and it also can automatically save your post as drafts. It allows tabbed blogging. That is you can create more than one blog at a time. Each post appears as a tab. The image editing features of Live Writer worth mentioning because it provide you with some basic image effects that is very helpful to add image effects to your images. You can also add videos, podcast etc to your blog. The only downside is that the preview is rendered exactly the way it looks in IE! The software is in its beta now. So it is not a completely stable version. Sometimes after this beta we will have to wait and see if it remains free or become commercial or become a part of Microsoft Office suite. So grab it now!
 Qumana
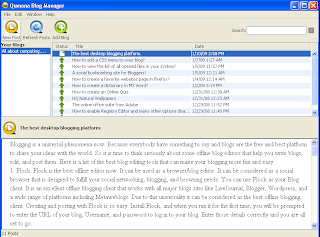
: A nice blogging tool you would use especially if you are a beginner and still learning how to post blogs using offline clients. It has a nice interface and so it is very easy to learn. Then it has all the features you expect from a blogging client. When you run it for the first time, it will prompt you for your blog address. Just type in your address, User name and password. Qumana will automatically configure everything for you. This is a feature that is of great help. Creating posts with Qumana is also easy. Another feature it possess is that it gives you the opportunity to monitonize your blog using QAds. You can sign up for QAds and insert ads in your posts. Then it has a blog manager which helps you to manage your posts quickly. In the Blog Manager window you can see the number of blog posts and you can preview, edit, publish, and republish posts. But it is a bit slow. It is a cross platform tool, that may be the reason. It is noticeably slow when you spell check your post. Above all it is one of the best blog editors I ever know.
w.blggar: It is a fantastic blogging tool that works well with Windows operating system. It is a good replacement for Live Writer! Because Live Writer is in beta there may be some stability issues, because Quamana is Cross Platform it has some problems running in Windows. So the tool that you have to watch out for is w.blggar. When you launch w.bloggar for the first time, the configuration window will appear where you have to select a platform and enter an alias for your blog. Then you have to enter User name and Password of your blog and press Finish button to complete the installation process.But creating posts is not easy for novices because w.bloggar did not have a WYSIWG feature. It instead has a text editor. It supports HTML syntax highlighting. Unfortunately it did not support tags. It also did not have an image editor. Truly not for novices. But it is quiet stable and almost never crashes. It also has good blog backup feature. It also has powerful FTP uploading features that definitely worth a mention. It supports a wide number of platforms. It is a tool apt for a pro-blogger.
 Zoundry
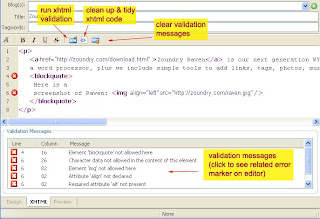
: Zoundry is another blog editor that you can give a try. It is one of the best blog editors both in case of usability and functionality. After you have properly configured Zoundry you can start creating your blog. I will mention quickly some of the features I like the most about Zoundry. It has an intelligent tag completion feature as you see in website design tools like Dreamweaver. So you will love using HTML scripts while creating posts with Zoundry. The auto complete list includes both XHTML and CSS keywords. It has Design, XHTML, and Preview modes. You can create multiple blog profiles in Zoundry. It also supports a large number of blogging platforms. It also offers good blog back up features. It is highly extensible with plug-in support. All you have to do is to visit Raven Zoundry site and download plug-ins you need. Then extract and copy them to your Zoudry installation folder. Then there is a blog profile manager and good tag support. Lot of cool features you can explore and find. Amazing tool that worth a try!
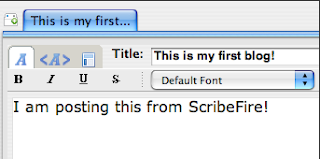
Do not want any of these tools just log in to your blog account and create post there. Alternatively, you can also use MS Word which support blog creation and posting. You can also use
ScribFire which is a Firefox plug-in for blogging. It gives you the comfort of blogging inside Firefox. There are commercial alternatives also like
BlogJet and
ecto.
I hope you enjoyed the post!
Here is a full fledged online Myspace theme creator. It will help you to easily create themes for your Myspace profile. To get started click
here.
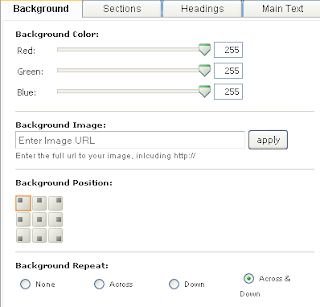
It is a cool Myspace theme creator you will love. What you should have to do is to just click on tabs named Background, Sections, Headings, and each of which relates to different elements of your Myspace profile. For example, the Background section allows you to edit the background components of your profile. In the Background section you can customize the Background color, Background Position, add a background image, align the image etc.
The second is Sections tab which allows you to edit look of each section of your profile. Just play with the sliders until you are satisfied.You are provide with a live preview of what is happening to the look of your profile on the right side. In Sections part you can edit the border size of each page element, Border color, Background color of each section, Border styles, and finally the Opacity.
The next section is Headings where you can edit headings of each section of your profile. The first section here is Name Font section which allows you to edit the way in which your name is displayed in your profile. You can determine the size, font, color etc of your Name. You can also edit Contacting Member Name section properties of your profile here.
The final tab is the Main Text section which allows you to edit the way the details you have in your profile is displayed, its color, font,font size, color of links, and link hover color.
After you have successfully created a cool profile click on the Generate Layout button to apply the changes to your Myspace profile. When you click on this button you will be provide with the instructions to apply theme you have created to your blog. A nice and cool way to create breathtaking themes to your Myspace profile. Also attract more friends and get their appreciations for your artistic themes.
You want to tell a lot of things through a blog. You probably give labels to your blogs so that people can click on those labels to go to the posts related to that label. They can also navigate using the blog archive in your blog. But as your blog becomes bigger and bigger it may contain lot of labels and archives and you find it more difficult to manage them.
The user who visits your site also found it too difficult to find what he want. So you can give your visitors an idea about the topics you are blogging about by adding a menu to your blog. If you are blogging about Linux then you can add menu items like News, Tips and Tricks, Softwares, Resources etc. By clicking on these links they can easily navigate to each section in your blog. This adds more professionalism to your blog and it also make your blog more easy to navigate.
I will tell you how to add a CSS based menu in your blog. First what you need is an image that can be used as the menu. You can use this image.
Upload your image to a free image hosting service like
Picasa web albums. Then copy the URL of this image and paste it in a notepad file because you need it to continue this tutorial.
You now have successfully hosted your image and have the URL of it with you. Now we are going to add the CSS script to your blog. I think you all know what CSS is. It is used to add styles to web documents. It is used to format images and text contained in a webpage. So we have the image and its URL. We have to format this image using CSS and add it to our blog. Here is the CSS script that we are going to use.
#tabsH { float:left; width:100%; background:#000; font-size:93%; line-height:normal; } #tabsH ul { margin:0; padding:10px 10px 0 50px; list-style:none; } #tabsH li { display:inline; margin:0; padding:0; } #tabsH a { float:left; background:url("tableftH.gif") no-repeat left top; margin:0; padding:0 0 0 4px; text-decoration:none; } #tabsH a span { float:left; display:block; background:url("tabrightH.gif") no-repeat right top; padding:5px 15px 4px 6px; color:#FFF; } /* Commented Backslash Hack hides rule from IE5-Mac \*/ #tabsH a span {float:none;} /* End IE5-Mac hack */ #tabsH a:hover span { color:#FFF; } #tabsH a:hover { background-position:0% -42px; } #tabsH a:hover span { background-position:100% -42px; }It is time to add this script to your blog. So first login to your blogger account. Now click on the Layout tab and select Edit HTML. This will show you the HTML code of the template of your blog. You are going to edit this template. So make sure that you take a backup of the current template.
Press CTRL+F and enter the following lines in the Find search box.
Now enter the CSS script just above this line. Replace "tabrightH.gif" in the CSS script with the exact URL of the image. Click on the Save Template button to save changes to your blog template.
The next step is to add HTML script for this menu. To do that once again you have to click on the Layout tab. You have to select the "
Add a Gadget" option. From the list that appears select
HTML/JavaScript. Now place this Gadget just below your blog header image. Click on the Edit link to add HTML script to this Gadget. Here is the HTML script you are going to add.
Now you have to add some links to the "#" section in this script. I think you have labeled all the post in your blog. So replace this section with "http://youblog.blogspot.com/search/label/
lablename". Replace label name with a label you have used in your blog. Say, if you have a blog about Linux and you labeled some posts with "TipsnTricks" then replace
labelname with TipsnTricks. Replace Link1, Link 2, Link 3, Longer Link Text, Link 5, Link 6, and Link 7 between the
opening and closing span section with the names you want to give to these links. Click on Save button to save your changes. Also save changes to your template.
You have successfully added a CSS menu to your blog. Visit
exploding boy website for more CSS menus and scripts.
I hope you enjoyed this post!


